Showing posts with label 1940. Show all posts

Monday, 7 July 2025

CoC2 - Attack and Defend in 1940 France

 Another busy gaming weekend!  After the big Jhamjar game on Friday, Craig came by today for a second try at Chain of Command second edition.  This time we played the Attack and Defend scenario, which allows for much more support.  Craig's French chose to be the attackers with 12 points of support, and my Germans downgraded to a second wave platoon, which meant that I was allowed 8 points of support (base of 6 which is half of Craig's 12, plus 2 more for the difference in force rating).  We rolled for table orientation and again found ourselves playing lengthwise, adding to the challenge for the attacker, giving him further to go on a narrower front.

Here is the table Arthur set up for us.  The French attackers enter from the top of the photo.  Designated objectives for the attackers are the ruined building on the left and the lone tree on the right, both circled in red.


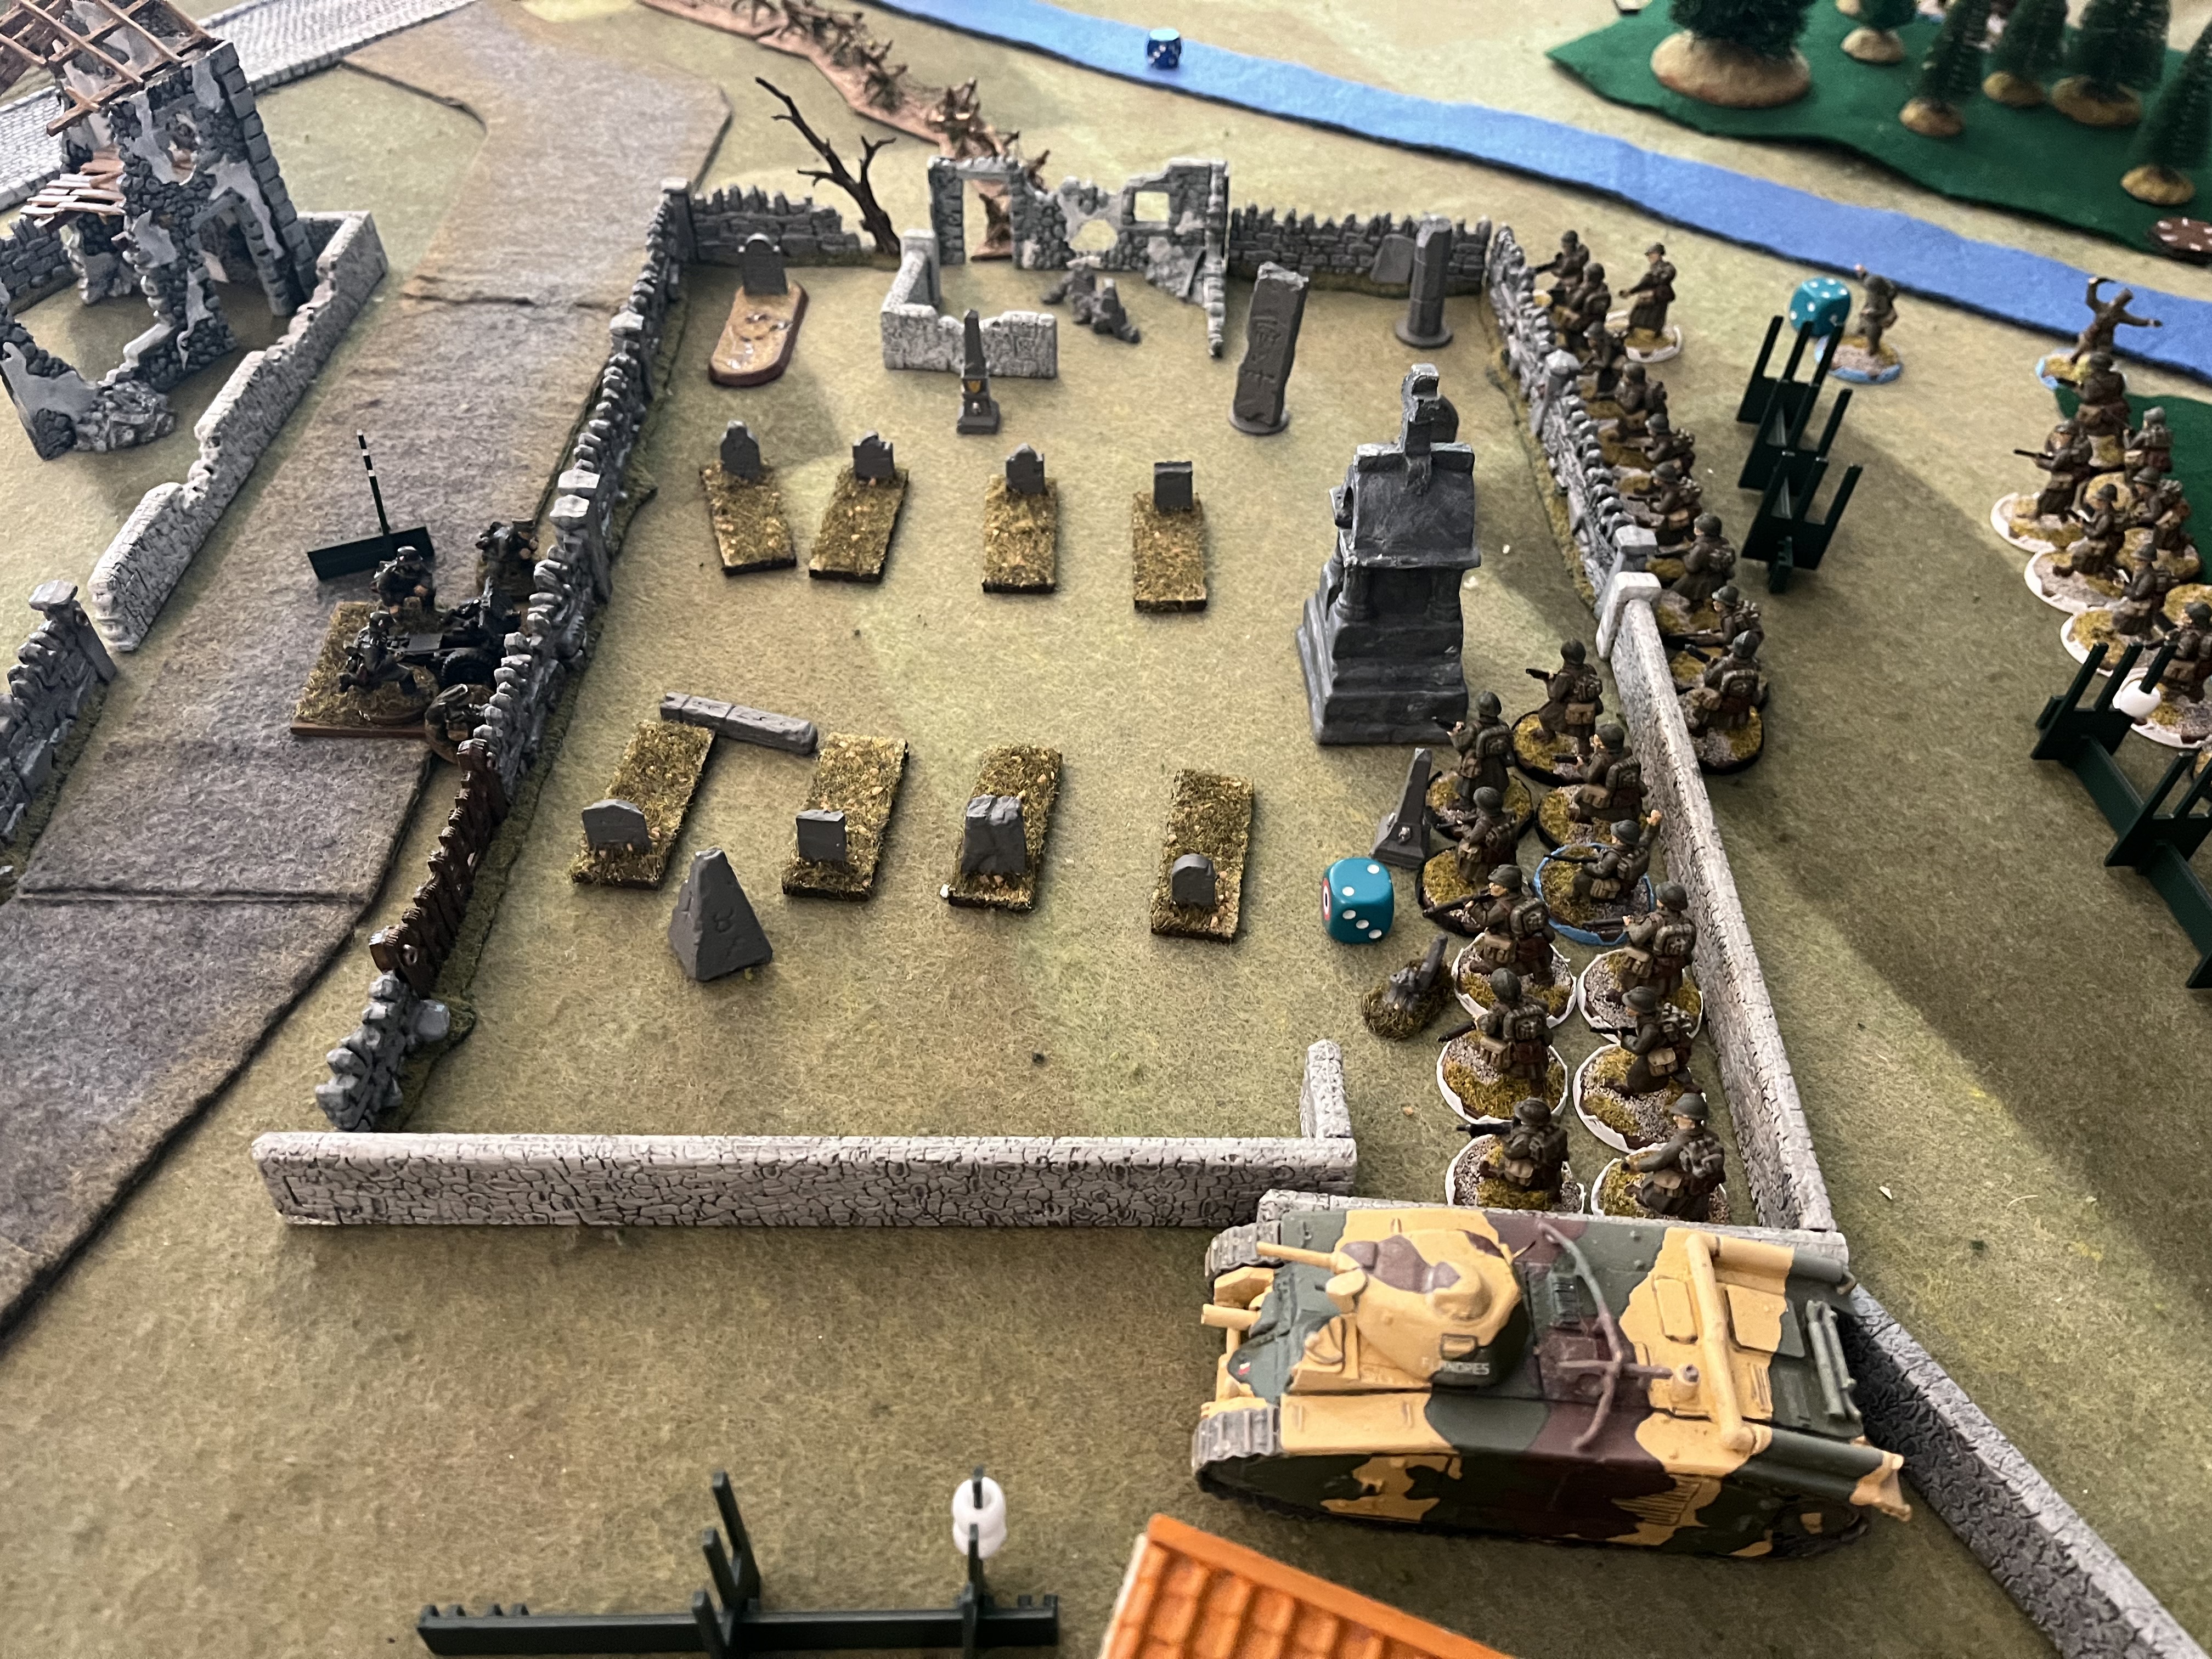
The patrol phase ended up with patrol markers locked down on either side of the cemetery. The French had 4 markers (the red ones with the maple leaves - originally intended for the 1st Canadian Division in Sicily but we made do with what we have!) but Craig ended up stacking them in pairs to shut down the maneuvering, to prevent the rightmost white marker (Hermann Goering Division, also for Sicily) from swinging further right.


Jump off points are a bit boring today!  We used the brown hex markers circled in red.  I have fancier JOPs but I was a bit too disorganised to pull them out.  Note that the French markers as on the wrong side of the stream, which was rated as a minor obstacle and broken ground, a nuisance for the French but not too much!


I purchased two sections of barbed wire (6" each), and Craig generously pointed out that in V2, there is a three for two deal, so I ended up with a total of 18" of barbed wire :)  I used it to block the left side of the German defences. 


Early deployments with French and German sections on either side of the cemetery.  French are already taking shock as shown by the white counters on the 'tree' beside them.


The Germans deployed a 'shabby Nazi trick' in the form of a collaborator, who redirected French troops away from the last jump off point.


More troops deployed on the board, including the French heavy tank, a Char B2 bis.


In response to the French tank, the German infantry gun (7.5 cm le.IG) deployed.


Cemetery firefight continues.  French manage to kill the German feldwebel.  It's a Bad Thing to lose a senior leader and German force morale takes a hit!


Then the Char crossed the wall and dispersed the German squad.  The rifle team hid in the small building, but the MG team was broken and fled the table.


The German section by the wall was getting shredded so they fell back to the ruins across the road, with the MG team moving to the upper floor to put fire onto the attackers.


Iggy the infantry gun is feeling a bit outnumbered.


And then the gun crew are driven off!


But then the Germans bring another section.  They cannot crew the gun, but they can lay down fire on the French!


German officer moves up to direct the fire of the MG.  His guidance allows the use of the German special trait, maschinengewehr which adds firepower dice as well as the storm of steel effect, where each '6' rolled adds another firepower die to be added, with the potential to increase firepower indefinitely as long as the firer keeps rolling 6's.


French char attempts another overrun of German infantry.


This time, however, the Germans had no shock on them and were easily able to avoid the tank, allowing them to move against the French infantry following behind the Char.


French and Germans passed tactical status back and forth.


Here is a result of a maschinengewehr roll - 10 dice initially turn into a total of 14 hits!


Germans are successful in pushing back the French past the cemetery wall.  


And the French Char struggles to turn to face the German infantry in its rear.


French officer struggles to rally his forces.  This photo is a bit deceptive, as only the French infantry on the left side of the creek are still in the game, the others are the casualties' pile! But still, there is a lot of shock that the officer needs to rally.  This was when we called the game as a stalemate. Unusually, the French were still at their initial force morale level of 10, in part due to Craig's use of Chain of Command dice to avoid FM checks, but also due to many units getting hurt, and combat effectiveness reduced, but not actually breaking.


German force morale at this point was 6, and the remaining troops were barely holding on, and they had a heavy tank in their rear.  Although the Germans had no way to hurt the tank, the tank was not able to capture the objective.  The Germans stopped the French advance by beating all the infantry and working around the tank.  If we would have played on, it's likely the French would finally have forced the German force morale to break but would not have a combat effective force left to take advantage of the result.

The game allowed us to explore more aspects of the V2 changes. Mostly we are pleased but there are a couple of things we want to look at more closely.  Storm of Steel is a nice bonus, and we remembered to use it this time.  We talked about introducing a house rule to limit the bonus to a single extra roll for each initial 6, but to not allow indefinite stacking as we had a few cascading results that seemed excessive.  We'll look at this more as we play on with these rules.  

The Red Die is very powerful.  I used it last week, and Craig had it this week.  It really gives a great benefit.  We aren't sure if we should limit it, in a similar way to how we limited Green and Elite troops in V1, or possibly to rate it to be more expensive than a 2 point cost.  Perhaps we'll come up with a house rule to limit the use of the red die.  The 1940 sourcebook requirement that you need a minimum of three support units before you can pick a red die is a good start point; we may want to clarify that further - for example, maybe require that the three supports should be a minimum of 2 points each, so that a medic or wire cutting team don't count, only supports that can take offensive action.  Another thing for us to discuss further! 

A thing that has irked me for a while, not new to V2, is that roadblocks, minefields and barbed wire have the same value, even though minefields are more difficult to deal with as they take up a bigger piece of ground and are harder and more dangerous to clear.  On the other hand, I have less experience in dealing with either, so I should play more games where they are involved before taking too strong of a stance.  Barbed wire worked to my advantage in this game since it pushed Craig to concentrate on the other side of the table.


Saturday, 28 June 2025

Intro to CoC2 - Probe in 1940 France

 Chain of Command second edition was released at the end of May, and I have spent the past month learning about the revisions in the new edition.  Today, Craig brought his 1940 French over for a playthrough of the Probe scenario against my 1940 1st Wave German infantry.  We picked the Probe as it is a smaller scenario, but unlike the Patrol, it includes an emphasis on objectives and the new Final Countdown mechanism.  

Before Craig arrived, I set up the table and diced for table orientation, getting lengthwise rather than across the width, and for support points, getting a 9 for the German attackers.  This translated into 6 points for Craig's French, including balancing for the difference in force value.

Here is the table.  Germans entered from the right, and defending French came from the left.  The woods in each of the opposite corners were considered badly obstructed, heavy terrain.  The stone walls are moderate obstacles and the wooden fences are minor obstacles.  Line of sight through the orchard in the foreground is lightly obstructed.  The rest of the table is open ground.


At the end of the Patrol Phase.  I don't have generic patrol markers, so we used my Op Husky markers for 1st Canadian Division and Fallschirm-Panzer-Division 1. Hermann Göring.  Here are the final positions of the markers.  I'm getting better at the patrol phase, so I was able to place my Jump Off Points further onto the table than when I was brand new at this game.


The first German infantry move into the farmer's field.


The French infantry deploy to counter them.


More Germans deploy as their mates move forward.  A French franc-tireur managed to shut down the German JOP on the left for several phases - that was a well-chosen support choice by Craig!  The green 'trees' are a clever innovation that Craig came up with.  Each of the uprights can hold several markers - most importantly shock markers (white) but other colour coded markers include yellow (one for pinned, two for broken), green ammo used (for teams with limited ammunition like light mortars) and wound status (red for wounded, blue for stunned).  The two forward sections have moved at the double, which earned them two shock markers each, but each section JL rallied off of them.


A few more phases into the game.  The blue barrel JOP is finally usable.  Craig's FOO has called for a mortar barrage, with the white smoke marker showing the location of the ranging shot.  The nearby section in the orchard is pinned (yellow marker) by the ranging shot.  The section in the foreground is also pinned, but as a result of defensive fire from the French infantry.  As it turns out, we overrated the effectiveness of pinning from the mortar ranging shots, both with the distance from the ranging shot and how long it took the pinned units to recover.  They are only supposed to be pinned for the phase of fire and the next phase, but we ended leaving them pinned until the turn end.


This next event was unintended!  My German section advanced through the orchard but accidentally overreached, and ended up in close combat with the French!  The close combat worked out to be even odds, with 12 dice for each side.  Due purely to lucky dice, the Germans routed the French with 5 kills to 1.  The French rolled a 6 for leader, so he was luckily not one of the casualties.  Nonetheless, the French section broke and fell back 18".  V2 places a big emphasis on facing for individual figures, and the French had been focussed on the Boche across the field.


Here are the broken French.  The coloured wraps on the bases help to identify which team each figure belongs to, with the blue base for the JL.  Their 'tree' is visible, with two yellow beads indicating that they are broken.


By contrast, here are my Germans.  The LMG team have larger diameter bases, and the JL base is taller.  All of these have two dots on their bases, showing them to be in the second section (or gruppe, I suppose, as they are Germans!).


Finally, the dastardly boche open fire on the broken French squad.  This destroyed the squad, and the result was to bring Craig's force morale down to 0, giving the game to the Germans.  The d12 in the farm cart is tracking the remaining phases in the Final Countdown.  


I didn't get a good photo of the German sniper.  He must have had good camouflage!  His arrival was delayed by several phases by the franc-tireur, but once he arrived, he was a fair nuisance to the French, inflicting multiple casualties including a junior leader, as well as adding loads of shock.

I actually got so involved in the game that I forgot to take photos of quite a lot of the action.  The French mortar took several ranging shots before fixing a location he liked, and then wasn't able to get the '1' he needed to bring down the pain, so a lucky break for the Germans.  I also missed out on much of the activity in the farmyard.

There were couple of things we realised after the game that we missed.  In addition to the mortar rule mixup I mentioned above, we forgot about the new Storm of Steel rule.  Craig's V-B rifle grenades were very effective in the game, but if we'd remember SoS, they would have been deadlier!  Since SoS also applies to the German special maschinengewehr rule, it gives a good reason to use it more often. 

We had a great game, and are looking forward to having another one soon!

Saturday, 13 May 2023

Morris CS9 Armoured Car

 From Jeff Trnka's JTFM, this is the Morris CS9 armoured car.  There were a few of these in the BEF in 1940, serving with the 12th Royal Lancers.


Although it's barely visible, I've given the vehicle commander a scarf in the yellow and red stripes of the 12th Lancers.


As always, a lovely vehicle from Die Waffenkammer!

Sunday, 7 May 2023

Bolt Action Sea Lion - Airfield Defence

 On Friday I brought my 1940 Highlanders to participate in Lisa's Bolt Action Sea Lion campaign.  Fortunately I also brought my 1940 Germans, which stood in as fallschirmjagers under John's control. The scenario had my Highlanders organised as an airfield defence platoon who were required to protect RAF Lympne from a raid by German paras.

This was my first proper game of Bolt Action:  I'd had a playthrough a few years ago with my Jhamjar armies, but this was the first time with 'proper' forces and some guidance from experienced players.

The game started with most of my platoon dispersed around the airstrip, using a few bunkers for defence, waiting for an attack which could come from any direction.  I had a Rolls Royce armoured car and a section of Royal Navy armed sailors off table in reserve.  The Germans rallied their paras off table, and came on to the table from the southwest.

As the Germans came on, my Vickers MG was able to lay on some fire, but it was rapidly flanked and wiped out.  A section of infantry lay down fire from across the airstrip, and kept the Germans occupied while the rest of the platoon moved down the airstrip to engage the enemy.  The reserves came on as well, the Roller being very effective at suppressing the Germans.


Here we see the Germans coming on around the Quonset huts while the Highlanders opposite lay down fire.  To the upper right, another section of Highlanders is starting to react - they waited to see if any more Germans were coming in elsewhere before leaving their position to take on the force coming in to their left.


The Highlanders in the foreground are bravely holding and laying down fire as their mates come along to help them out.  As inexperienced troops, they took casualties pretty every time the Germans fired on them, but they hung on!  Meanwhile, the Germans were veterans and very difficult to kill, but I just kept on piling on firepower so they were too busy rallying off the pins to break out of their positions.


The Rolls Royce has arrived, and is laying down fire on the Germans to its front.

The balance of the Highlanders advance, using the aircraft on the airstrip for cover.


The RN armed sailors have arrived, taking the pressure off the remnants of the Highlander section (now down to just the Bren gun and loader).

This was pretty much the end of the action.  The Germans are falling back, but still control one of the objectives, the Quonset with the green pawn.


  The Highlanders were pleased to have chased away the Germans, but unfortunately for the British forces, the Germans enjoyed greater success elsewhere.  Of the three Sea Lion campaign games on Friday, two went to the Germans, with the Highlanders' success at RAF Lympne being the exception.

Sunday, 23 April 2023

Panzer I and II

 Two more tanks for my 1940 Germans.  These are a Panzer I and a Panzer II from Die Waffenkamer.  As usual, lovely models from JTFM!  Once again, I kept the paint job as simple as possible.


The tank commander for the Panzer II is removable.


I was surprised to find out how small the Panzer I is!  It is about the size of a British universal carrier.  Here's a comparison shot with a soldier looming over it :)


Monday, 10 April 2023

German reinforcements

 It's been a couple of months since my last post, apologies for the lack of content.  Things have been busy.  Painting and gaming have been on the back burner, but still slowly progressing.


First up, a German command pack from Warlord Games!  Naturally, there is the stern commander, complete with monocle, who will is a fantastic looking figure but will likely only take part in a pulp-style adventure game!  Of more practical use are the medic and the forward observer/radio operator.  And of course, one more tough, veteran NCO with MP40.  He certainly looks the part, but I really have more of these SMG-wielding NCOs than I have need for!


In the Chain of Command Blitzkrieg 1940 book, some German platoon are allocated 4 squads, and on most lists even for the 3-squad platoons, a fourth platoon is a support option.  Accordingly, I decided I needed another squad, "just in case".  These troops are from Artizan Designs.  Although the other troops in the platoon are from Crusader, I wanted to add these Artizans for the fourth squad, partly for variety and also because Mike Owen, Artizan's owner and sculptor, actively collaborated with Mark Sims of Crusader to ensure the figures would be compatible.  Strictly speaking, the Artizan figures are designed for 1942, so there are some minor uniform differences with the 1939/40 uniforms of the Crusaders.  I'm not sufficiently educated in these details to spot the differences, though!


Another option from the Blitzkrieg book is to field Germans with antiquated, World War I era equipment.  To allow for this option, I picked up some Great War Miniatures Germans armed with MG08/15 machine guns.  In this case, I CAN spot some of the differences with the WWII uniforms!  I did minor modifications (scraping away the puttees and painting them to look like boots), but at arm's length, they will serve just fine, and will show which squads have the obsolete machine gun instead of the MG34.


I also procured another Panzer IV for my German forces on Sicily.  I did this as I volunteered to host a game of What A Tanker at the Trumpeter Society's annual Trumpeter Salute convention next weekend, and I wanted 4 German medium tanks to counter the 4 Sherman tanks that I've lined up to face them!  This tank is a Warlord Games model, painted to match the other German armour I've already got.