Showing posts with label Terrain. Show all posts

Sunday, 30 March 2025

Spaceship scatter terrain plus train crew

 I'm still assembling terrain for spaceship boarding actions.  Cory from Trumpeters generously gave me a whole bunch of 3D printed consoles, cargo pallets and more, and I've also painted up some pieces from Terrain Crate, AK Wargame Series and others.


These doors are from AK Series.  They are not free standing like the Terrain Crate doors, so will need to be attached to the walls.


These are bits from the Terrain Crate Quicki-Mart set.  Not quite futuristic but can still fit into my spaceship.

Cory's 3D printed cargo pallets.


These are 1/35 hand trucks from MiniArt - those handles are very delicate and are certain to snap off right away!


3D printed cargo boxes from Cory.


Consoles:  the three on the left from Cory, and the one on the right from AK Series.


More consoles.  Three on the left from Cory and the one on the right is an AK ATM!


These are the last of the Pulp Figures human spacers - I still have a set of Martians to paint once I decide on their theme.


I also found time to paint up these Pulp Figures' railwaymen.  The chap on the left is a Eureka Miniatures VSF crewman who has been sitting in my lead mountain for about two decades!


And finally a raven that Doug gave us.


Sunday, 26 January 2025

Spaceship Interior WIP part 2

 Work is slowly progressing on the spaceship interior scenery.  


Getting a smooth cut on the walls continues to be a challenge.  I picked up a couple more packs of floor mats, and will cut some new ones, this time with a brand new, sharp blade, so that the cuts are not all ragged.

Meanwhile, I've painted a few new bits of scatter terrain.  These next few pieces I picked up at the Imperial Hobbies Boxing Day sale.  This thingy is supposed to be some sort of micro-scale spaceship from a monster battle game, but for me it will be part of the engine room for the spaceship.  Beside it is a Terrain Crate motor.


These computery pieces will be used on the ship's bridge.


Two piles of materials will be cargo in the ship, and can of course be used in 20th century wargames, too!


I finished up the Terrain Crate doors.


As well as some other Terrain Crate scatter pieces.


I have some more wall cutting to do.  Walls will be pinned in place with these little finishing nails.  This will hold them in place for a game and prevent accidental relocation when they are inevitably bumped, but will be easy to lift and move around to make a new layout.


One of the tricks to getting a clean cut (just like with foamcore) is to use a new, sharp blade. I redid the walls and this lot are smoother.  I tried using my hot wire foam cutter - it can cut the foam but it's nearly impossible to get a straight cut, and as these foam mats are much denser than insulation foam, cutting is a lot slower.  So a new cutting blade makes a big difference.


Next, I am going to come up with a few possible spaceship interior floor plans, and then cut wall pieces to match.

Saturday, 13 January 2024

Two More Western Buildings

 Happy New Year!  To start off 2024, here are a couple of buildings to expand my Old West gaming town.


First up is the Renedra Ramshackle House.  I didn't know this existed until I saw it on the shelf at The Sentry Box in Calgary.  I already have several buildings from this series, a collaboration between Perry Miniatures and Renedra, so it fits in with my current collection quite nicely.  


I assembled the roof to be removable so that figures can be placed inside.  This building comes with a floor, unlike the other buildings in the series.  Other than the floor, I chose not to decorate the building interior.


The house is slightly undersized compared to 28mm miniatures, especially when bases are considered.


Here are all five of my Renedra/Perry Miniatures buildings, including the ramshackle barn, store, ramshackle house, church and farmhouse.


Next up is an MDF two-storey shop from Sarissa Precision.  


Arthur picked up this kit months ago.  It has been sitting unassembled here for months until he finally asked me to finish it for him.  During the wait, two of the risers for the stairs disappeared.  Taking advantage of this, I did not attempt to replace them, instead leaving the gaps which are just the right size to allow a figure to rest part way up the stairs.


Figures fit nicely on the stairs.


The building is designed to allow figures to more around inside.  Although I again chose not to finish the interior!


Just as the Renedra building is slightly under scale, the Sarissa building is slightly over scale!  This has an advantage of allowing figures to move around easily inside the building.  On the other hand, it means that the Sarissa shop doesn't really match the others in my little town!  It's also somewhat delicate.  The balcony in front has already come apart once, requiring repair, and the stairs in the back are going to require some delicate handling.  Still, it was nice to build and paint and by adding a two-storey building the wild west games will get wilder!


Sunday, 10 December 2023

WWI No Man's Land Terrain

 As I'm on a bit of a WWI kick, it's time to add to my available terrain.  So here are some craters and similar terrain to place in no man's land between the trenches.  Naturally, these craters will also be useful for WWII and other settings, too!


And as a bonus, this blog post includes a how-to article!  The base for each of the craters is an aluminium tart or pie tin, to be mounted on wooden bases.


The tins are smooshed down into the basic crater shape, and the edge is trimmed off with scissors.


And a quick outline with a sharpie for the shapes that I will cut out.


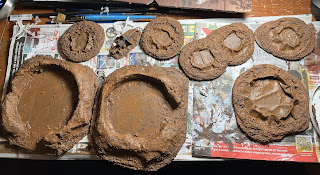
I used my glue gun to secure the tins onto the bases, and then gave them a heavy coat of gesso.  Getting paint to stick to aluminium is tricky - it flakes off very easily!  


Using white glue, I put a mix of sand and coarse sand/gravel to cover the join between the tin and the base, and also the very rounded glue residue.


After leaving the gesso to dry, I added a thick base coat of burnt umber (aka dark brown) craft paint.  And wait another day for it to dry.  Lots of waiting in the project, very difficult for me!


Then a dry brush with a lighter brown.  In this case I used a shade called milk chocolate.  Not for drinking!  You can see some extra pieces in the photo below.  These are gifts from Doug!  The big craters are cut from styrofoam, and the gun is a mis-printed 3D printed artillery piece that will really add some distinct WWI flavour to the terrain.  Thanks, Doug!


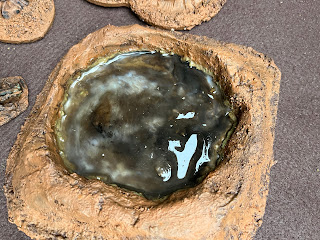
To make things a bit more interesting, I added a greenish-brownish base to some of the craters, and then (after another wait for the paint to dry), some Vallejo Still Water.  I mixed in some GW Agrax Earthshade ink or wash. Unfortunately, the still water resin ended up coming in a bit milky.  


Frustrated with milky still water, I pulled it out and re-gessoed the bases.  


I also filled in the opening for one of the large craters with some air-dry clay.


Here are the final pieces.  For some of the smaller pieces, the water effect worked out.


The larger pieces tend to show a bit of the cloudiness.


Playing around with the water effects was fun, but to my eyes, the crater on the left (with an agrax earthshade wash) looks about as good as the water effects in the crater on the right.


And finally, here are some shots with my GWM CEF added for scale.