Saturday 7 December 2019

Sappers

When the Waters were dried an' the Earth did appear, 
("It's all one," says the Sapper),
The Lord He created the Engineer, 
Her Majesty's Royal Engineer, 
With the rank and pay of a Sapper! 

Rudyard Kipling, Sappers. 


As I have now built minefields and wire obstacles, my next logical step was to recruit some pioneers or sappers to neutralise them.

Chain of Command allows a player to select one or more engineering teams, or alternatively a section of engineers or pioneers. These teams are specialised for wirecutting, mine clearing or demolitions. (Flamethrower teams are also an option, but I'm not ready for that yet).

Unfortunately, 28mm miniatures depicting specialist engineer teams are few and far between, especially for British and Commonwealth armies. However, I am intrigued by the versatility of plastic minatures, and so I obtained some more Perry Miniatures Desert Rats and got to work!

Here is the section, commanded by a junior officer (who will count as a Junior Leader in CoC).


First up we have the wire clearing team.


Two of these sappers have wire cutters, which are simply Bren gun bipods. The third member of the team is more of a generally helpful sapper, burdened with the tools of his trade.

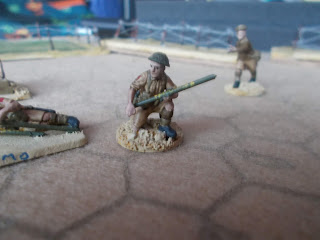
Next we have a mine clearing team.


Two members of the team are using their bayonets to carefully probe for buried mines.


The third member has been issued a 'Polish' mine sweeper.


The more I read about the contributions made by the Poles to the allied war effort, the more amazed I become. In addition to the Polish soldiers, sailors and airmen who fought alongside British and Commonwealth forces, there were many Polish contributions made to intelligence and science activities, including the 'Polish' mine detector. This would be more accurately called the Kosacki mine detector, but the name of its inventor was not advertised in order to reduce the risk of the Nazis taking action against his family in occupied Poland.


This figure is partially based on that one figure from the old 'army guys' toy soldier sets, that poor, useless bugger with the minesweeper, when as a blood-thirsty child, I thought any figure not carrying some sort of weapon was pointless! The conversion is more 'inspired by' the Kosacki mine sweeper than an accurate reproduction. I used what I had at hand!


The handle is a chopped-down Boy's Rifle, the detection plate is a shovel blade, and the backpack is the radio set. I used the radio operator as the base for the conversion, as he already had the headset.

Sometimes, it will take far too long to clear a barbed wire obstacle using wirecutters. In those cases, a Bangalore Torpedo is called for! First invented in 1912 in Bangalore by the Madras Sappers and Miners, the Bangalore Torpedo is a pipe stuffed with explosives, that is pushed into an obstacle by a series of additional (but empty) pipes, and then detonated. There's a pretty good scene showing its use in Saving Private Ryan:


Here are my sappers getting ready to deploy their own Bangalores.


They are joined by a chap with a box. I figure that he's got a 'use your own imagination box', with the idea that the box could be a detonator, or maybe some other sort of engineering whiz-bangery as needed.


So there's the section, to be deployed together, or in smaller teams as needed!


CHIMO!

Sunday 1 December 2019

Mine!


German forces in Italy during the Second World War made extensive use of mines and booby traps. The reading I've done indicates that Allied armies were very often forced to slow their advance to clear mines, or more unfortunately to clear roads after a mine destroyed a passing vehicle.  Some mines were designed with a ratchet system, which allowed several vehicles to pass over before detonating, so a vehicle in the middle of a convoy might be destroyed, and further undermining confidence whether an area was actually safe.

They were also notorious for setting booby-traps, as was depicted in this scene from 'The English Patient':


In Chain of Command, a defender may be allowed to deploy a minefield.  Each minefield is to be 6" square, which I understand to mean a square 6" on each side (36 sq. in.), not a measly 6 sq. in.!

Best practice for minefields is to mark them clearly, so that they can be avoided by friendly forces or civilians.  (in the modern world, leaving an unmarked minefield can even be considered a war crime, but I'm pretty certain that this convention was not in force until long after the end of WWII).  Accordingly, my first minefield is the 'polite' minefield, that clearly states what it is, where its boundaries are located, and warns against entry.


The second minefield is not so generous.  I've identified this minefield with a large crater, and the debris of an explosion, to show that someone found this minefield by surprise.  The truck is a bit dated, as it is a WWI-era Ford Model T.  No doubt either side would have been quite happy to use even a Model T to haul supplies, if they found one still running!


And to finish, here is Captain Blackadder's advice to Lt George, on what to do if one treads on a mine:


Sunday 24 November 2019

It takes a village...

In preparing my tiny troopers to battle for control of Sicily, I realised that they would need some tiny terrain to battle over.  This began a quest to procure some appropriate buildings and other features to construct a Sicilian village.

I considered scratch-building but quickly determined that it would be beyond my skills or patience to construct anything that looked good enough to meet my needs.  I looked at MDF buildings but decided that they looked too flat, with angles that are too regular for my tastes.  I was temped by paper buildings, but again the texture turned me off, although price-wise, paper buildings are very hard to beat!  And there are certainly some very attractive paper building choices available.

Finally I decided to purchase resin buildings.  Pricey, but I am very pleased with the results.  


I bought these from Brigade Games Spanish and Caribbean buildings line.  The set I ordered includes three small buildings plus the hacienda, and I added the stables and the fountain to fill out the order.  I have spent the time since they arrived in assembling and painting them.  Turns out there is quite a bit of fiddling around with resin buildings, between cleaning the pieces, assembling the buildings, filling gaps with putty and more.

The fountain turned out to be quite substantial, bigger than I had expected based on the photo on the website.  I am pleasantly surprised by how big it actually is, as you can see with the soldier below (Perry Miniatures).


I also repainted an Italeri wall set to match the colours used on the fountain.


I also dug out a few MDF walls that had been in my terrain box and gave them a bit of paint as well, to provide even more terrain to fill out the table.  The pre-painted MDF had been a bit dull, but adding just a little bit of paint really makes them fit it much better.


Here are the four smaller buildings.I treated them all pretty much the same.  I assembled them, filled any gaps with green stuff putty, primed them and painted them.  Roofs can be removed to allow figures to be placed inside.  Each building has been based on MDF board, which will hopefully make them a bit more durable in case of getting dropped or other misfortune.


Here is the first house.


For all the buildings except the stable, I added some textured Plastruct plasticard flooring, as you can see here.


You can see the roof with structural support added to give it a bit of durability during play.


Building #2 is similar to building #1, with a simpler, unpeaked roof.


Building #3 is taller, with an implied (but not actually present) second floor.


The stables have big, removable doors.  I decided against installing hinges; the doors can be removed if necessary during play.


And now la pièce de résistance, the hacienda.  This is a big building, with a big footprint, two floors and a large balcony.  


As with the other buildings, the roof is removable.


And so is the roof over the balcony.


Inside, there are two floors.  The upper floor is also removable.


The table came from my bits collection (it is originally from a Foundry WWI set!), and serves as a handle to lift the upper floor out of the building.


Which then allows access to the ground floor!


The start of this Sicilian village inspired me to pull my Warlord Games ruined hamlet set out of storage, to confirm that it fits in well with the new buildings.  Works for me!


As I now have a nice big sheet of MDF, I took the opportunity to add some strength to the barbed wire obstacles I made a few weeks ago.


The bases are now quite thick, but still serviceable.


Too add some more interest to the tabletop, I picked up some 1:48 dollhouse furniture from my nearby dollhouse shop.


There's even a dunny in case the toy soldiers need to answer a call of nature!


To my mind, I've got a good start on the village.  Enough at least for a game, especially when I add in other terrain in my collection.  Maybe in the new year, I'll see if I can procure a church for this village...